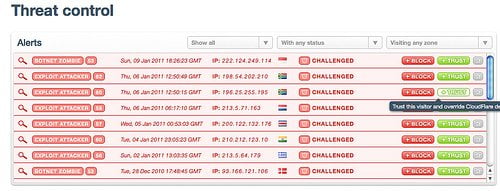
One of the benefits of CloudFlare is that it provides broad, effective security for any website. CloudFlare is a first line of defense against all sorts of threats from comment spammers to automated crawlers that don’t follow robots.txt. When you sign up for XeonBD’s hosting account you can control CloudFlare’s features from your cPanel, you get a Threat Control panel. The Threat Control gives you insight into malicious visitors coming to your site.

As an important side note, threat traffic typically doesn’t appear in Google Analytics. So, many web admins don’t realize the number of malicious visitors coming to their websites.
We wanted to share some tips on how to interact with the Threat Control panel.
Threat Control Basics
You can get to your ‘Threat Control’ by going to: Websites-> Dashboards-> Threat Control
Threat Control Overview
The Threat Control panel shows the malicious traffic to your website. The alerts are broken down like this:
Type of threat that came to your site (spammer, exploit attacker, botnet zombie, email harvester, bad bots and crawlers)
Date and time of potential threat
The IP address of potential threat
Country Flag (origin of the country by threat)
Status
Action (Block or Trust)
CloudFlare shows high priority alerts for things that should be reviewed. These have a “!” symbol. Generally, high priority alerts fall into one of two buckets:
A) Visitors who CloudFlare challenged but passed the CAPTCHA and left a message requesting to be permanently whitelisted
B) Visitors who were listed as threats in CloudFlare’s global system but your security settings allowed to get through
Sometimes people are not sure what to do with the Threat Control. Other than reviewing the alerts with a “!” (which always surfaces at the top), you don’t have to do anything. You can just let CloudFlare do its thing. But, if you want to dig into the data more, here is an overview of what it means.
Taking action against a threat alert

Using an example from my personal blog, I had a couple of exploit attacker attempts on January 5 and January 6. Given that exploit attackers are looking to do something malicious on my blog, like looking for weaknesses to inject malicious code, I can choose to block these visitors. If I use the ‘block option’ on the right, any future visits from this IP will be blocked from entering my website.
Note: The difference between appearing in your Threat Control and Blocked list is that visitors in the Threat Control are presented with a challenge page, where entering a CAPTCHA gains them access to your website. Blocked visitors are not given the CAPTCHA so there is no way for them to access your website.
Adding your own entries to block
![]()
You can easily add IP addresses to your Threat control. We’ve created a ‘Create A Custom Rule’ option that allows you to block or trust by individual IP address, IP range, or Country. Here is a quick rundown of the options:
Block individual IP address = The specific IP is banned from accessing your site
Block IP range = IP range is banned from accessing your site
To block by IP range:
To block 123.45.*.* you would enter 123.45.0.0/16
To block 123.45.67.* you would enter 123.45.67.0/24
Block by country = All visitors from that country are presented with a challenge page. This is different than being banned. If a visitor passes the CAPTCHA, they gain access to your website. This allows legitimate visitors in a ‘bad neighborhood’ the opportunity to access your website.
To block by country:
Enter the country name in the field (a drop-down list will appear) and choose the block option.
Trust List:
Any IP address, range, or country you’ve trusted will be added here. If you would like to remove an entry from your ‘Trust List’, simply click on the ‘trust’ button to remove it as an entry.
Block List:
Any IP addresses, ranges or countries you’ve blocked will be added here. To remove an entry from your block list, click on the ‘block’ option.
A couple of quick notes
We would recommend reviewing entries in your ‘Threat Control’ panel on a regular basis for the following reasons:
- Challenged visitors may leave you a message requesting to be whitelisted. Review these carefully, since some sophisticated bots can write notes.
- Our data sources are reliable about who to challenge, but there will be times when false positives appear. The most common source is a visitor from a shared network like a coffee shop or university, where someone on the network has an infected computer doing malicious things online, but that visitor’s computer is clean. You can help correct these false positives by whitelisting that visitor in your Threat Control panel.
- Individual IP addresses are dynamic, which means they change. So a malicious IP may no longer be malicious after a few months. To help guide your decision about whether or not to remove a block, you can research the IP address on an individual basis on Project Honey Pot.
Modify your CloudFlare challenge page to align with your brand. CloudFlare allows you to add custom text and colors to your challenge page, and we are adding support for multiple languages in the coming weeks so visitors get a localized experience.
You have control over the security setting of each domain and can choose Low, Medium, or High.


