Typically, by default Windows Server Firewall 2019 is blocked by ICMP (ping). This means that the server never responds to ping packets from different hosts within your local network. Here, we will show you how to enable/allow ping of Windows Server 2016/2019 Firewall ICMP on Windows Firewall.
To Enable/ Allow Ping in windows server 2019 Firewall:
- First Step- Login to your windows server and click the Windows key to start Windows Firewall. Then, go to the search bar and start typing firewall. This will be followed by “Windows Defender Firewall with Advanced Security” which is shown in the image.
-

- Second Step- After clicking “Windows Defender Firewall with Advanced Security”, or if you go the other way, click Advanced Settings. Either way, open the Windows Defender firewall with the Advanced Security window and then select “Inbound Rules” from the left menu.

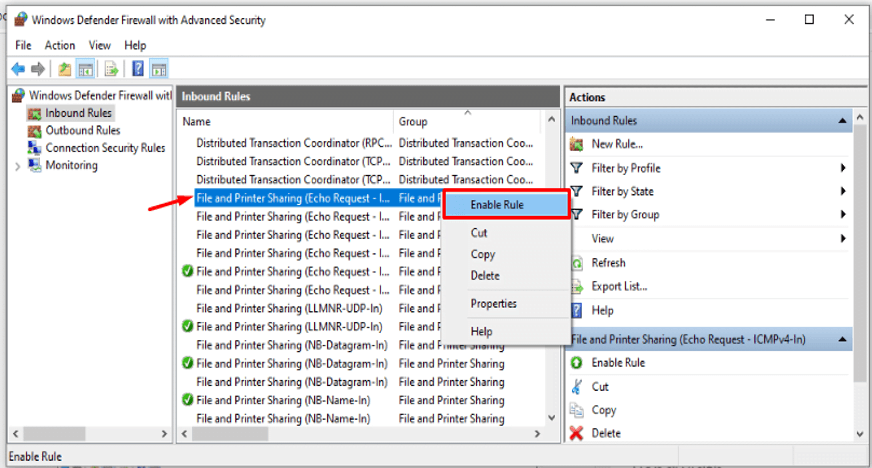
- Third Step- From the Inbound Rules, go to the list and select ”File and Printer Sharing (Echo- Request- ICMPv4-In)” and click the “enable rule”. It is only allowed/ enabled for IPv4 requests.

If you want to allow IPv6, you need to enable “File and Printer Sharing (Echo-Request-ICMP 6in)” which is listed below. See the image below:

- Fourth/Final Step- Once enabled, go to the “Command Prompt” to ping the request. At the command prompt, type the “ping and the server IP /domain name” ( ping 103.78.162.57/ domain name) and press Enter. It will show that the ping request has been successful (when it is the enabled rule)When it is the disabled rule, it shows “Request timed out”.

To enable this firewall rule, we have ping / enabled the network on Windows Server 2019. It can help us explore our network.


